This assignment we will create a picture book illustration using vectors and blending modes. Children picture books are a huge industry and there are many people that are looking for illustrators for their stories. Illustrators for children books make a certain amount of money per page or they charge per hour. Some illustrators even ask for a certain percentage of sales after the book is published, but this is only beneficial is the book becomes popular with sales. If you succeed well with understanding this assignment and vectors, you can use your skills for this avenue of work or making your own book yourself.
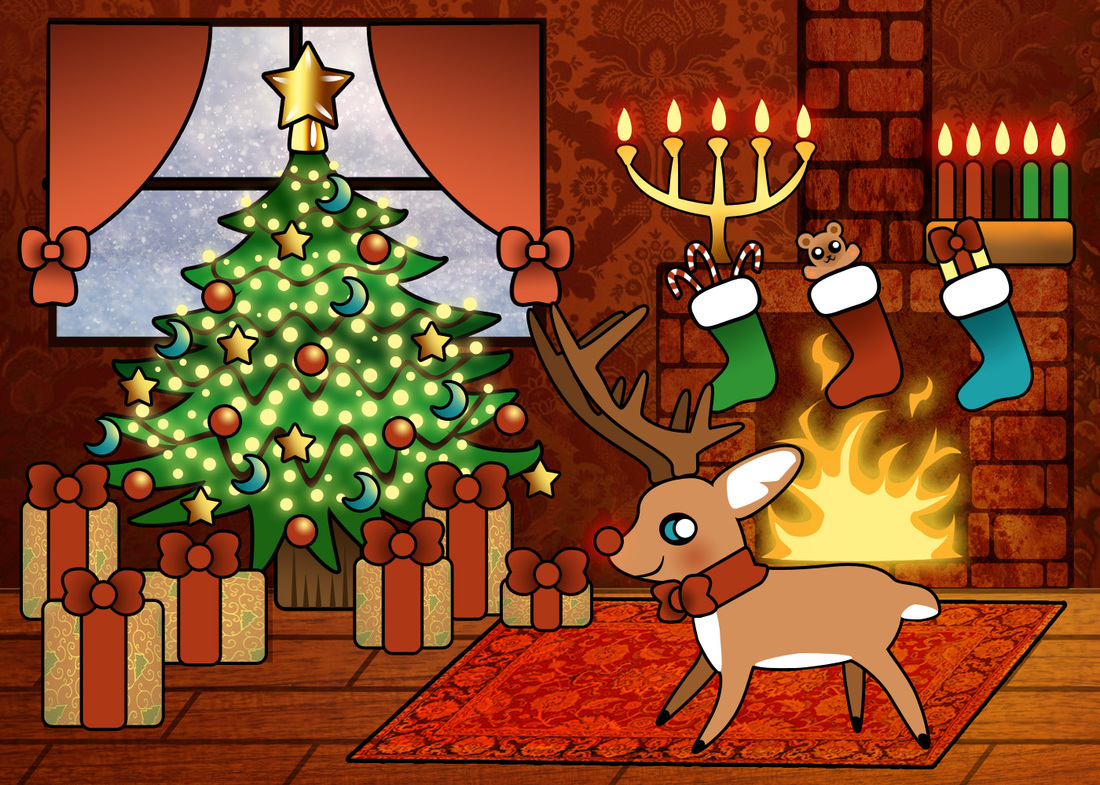
You will have to create a holiday scene, just like the example above. Unlike the other vectors, every bit of this scene is filled in. There is no empty background white space. The requirements for this assignment are really long and so you have to be able to read the directions. For every thing you leave out, you lose points, so check the requirements before you turn it in.
New required techniques for this project:
This section is how to do every part of this assignment! It would be good to work in this order on the illustration.
Image Size: 1700 Width by 1200 Height pixels
Last day to work in class is December 18th
Points: 50
You will have to create a holiday scene, just like the example above. Unlike the other vectors, every bit of this scene is filled in. There is no empty background white space. The requirements for this assignment are really long and so you have to be able to read the directions. For every thing you leave out, you lose points, so check the requirements before you turn it in.
New required techniques for this project:
- Rasterizing Layers: When you create a vector, you can edit the points like we normally do. If you right click the layer and click rasterize layer from the list, you will be able to turn the vector into a shape. This shape no longer is a vector, so you cannot change or add points. It is the same as any other image. What we will do is add gradients to this vector by locking it. (read below for locking layers)
- Locking Layers: On your layer menu, right under blending mode is the word LOCK. If you press the button right next to it you will be able to lock the layer. Locking the layer will make it so that you cannot add anything new to the layer. That one image on the layer is locked and you can only mess with that image, meaning you can only add something onto that image. If you lock a rasterized image, you can add a gradient to it which will give the image shadows and highlights. If you look at the image above, you can see that the ribbons go from dark to light. They were made with vectors, rasterized, locked, a gradient was added, and lastly a stroke was added.
- Outer Glow: The lights, candles, and fire all need an outer glow to them. Adding a glow brings a nice lighting effect. You can add outer glow by going to FX (the same place you go to when you use stroke) and click OUTER GLOW. If you mess with the spread and size, you can make the glow bigger or more intense or you can even change the colors.
- Naming Layers: If you double click the layer text you can rename your layer. This is a good tip so you don't get confused about where everything is. You will have to rename your layers for this assignment.
- Transform Path Perspective: If you go to edit-transform path-perspective on an image, it will allow you to distort images to make it look like it is going back in perspective. You will do this on your rug!
This section is how to do every part of this assignment! It would be good to work in this order on the illustration.
- Floor Tiles: Pick a brown color and use the rectangle tool to create a large floor. (it should cover 1/4 of the bottom canvas) Rasterize the layer and lock it. Then use the gradient tool to add a light brown to the top half of your floor. Make a new layer. This layer will be the lines that make the panels. Select a dark brown color and use the line tool to make a straight line across your floor. You can make a straight line by holding shift. Right click, Duplicate layer, and move it to create multiple panels going across the floor. Then, use the line tool to make short diagonal lines separating some boards, you can duplicate this layer and add many. Lastly, find a wood floor texture and use multiple on top of the floor.
- Wall: For the rest of your canvas, find a red color and use the rectangle tool to cover it. (don't cover your nice floor) Find a nice wallpaper texture that is big and set it on multiply blending mode on a layer above. Control+T to make sure it fits the entire wall.
- Chimney: Use the color black with the rounded rectangle tool to create the base for the chimney base. Make sure it touches the floor. Then, add another long narrow rectangle in the middle of your base going up. This will be the base of your chimney shoot. Make a new layer and use the Rounded rectangle tool with a red color to make a brick on top of the base. Duplicate this same brick again and again to fill the layers of brick on the chimney base and shoot. If you don't have room for that size of brick, you can use control+T to make it shorter across so that it fits. Find a brick/rock like texture and use a blending mode like multiply to put on top of the chimney base and shoot.
- Fire: You will create fire using vectors. You can use any shape tool in an orange color for this. You will have to add many points to make it look authentic. Make sure there are a lot of curves in your fire. When you are done with the orange base, you will do a light yellow fire in the middle of your orange fire. This will help make the fire look bright. Make sure you make many curves again. When you are done, merge the layers. Then go to FX and Outer Glow to make the fire bright!
- Stockings: On the layer above everything, use the red ellipse tool and edit it to create a stocking sock shape. Try your best. Then, rasterize the layer and add a darker gradient at the top of the stocking. (the fire place so these stockings need to look shaded) Add a stroke. After, on a layer above add fluff to the top of the stocking. I used the ellipse tool for this. Add the same sized stroke. When finished, merge both the fluff and sock layer together. (hold shift and click both layers. Then, right click and select merge layers, those 2 layers are now 1 layer) Duplicate the finished stocking 2 more times. You will have to change the colors of these 2 stockings. Do this by going to Image+Adjustments+Hue and Saturation. You can pick any 2 colors of your choice.
- Each stocking needs a unique gift inside. You will create a candy cane, a teddy bear, and a present.
- Candy Cane: You will need to edit a line tool (so you can see what you are doing) to create a candy cane. Start out with the color red so you can see it. When you are done, rasterize the layer and lock it. Then use the brush tool on white to draw in white stripes. Add a stroke. Move the finished candy cane under neath the stocking so it looks like it is coming out of it. You can duplicate as many as you want.
- Bear: Using the brown ellipse tool, you can easily create a teddy bear. I first created the entire bear without a stroke and used many circle tools to create the bear. I merged all the layers when I was done and then I added a stroke. That made it so that the outline is only outside the bear instead of all over the place. Use CTRL+T to tilt the bear at an angle (hover near the corner of the grid to do this) and place it underneath the stocking.
- Present: Pick a color for your present and use the rounded rectangle tool. Add a stroke to it. Pick a color for your ribbon and use the rounded rectangle tool to create a narrow box down the middle of your present. A layer above you will use the ellipse tool to create a circle in the middle top of your present. Hold shift to make a perfect circle. Make a layer below this circle and add another circle, you will edit it to look like the sample above, this will be a side of the ribbon. When you finished, rasterize the layer, lock it, add shading with a gradient, and then add a stroke. Duplicate layer and CTRL+T to flip it to the other side.
- Each stocking needs a unique gift inside. You will create a candy cane, a teddy bear, and a present.
- Hanukkah and Kwanza: On the Chimney top you will create a menorah and a Mishumaa Saba. (the candle holders they use.) The Manorah was create with and edited rectangle tool and ellipse tool. The Mishumaa Saba was created with the rounded rectangle tool. Both of the candle holders must have fire with an outer glow and a gradient for shading.
- Rug: Find an Indian rug on google images, copy it, and paste it on top of your floor. Go to Edit+ Transform Preferences+Perspective to edit with the perspective of the rug so it doesn't look so flat. Add a stroke.
- Window: Use a black rectangle tool as the base. Then, find a snowing picture on google images and paste on top of the base. Make sure it is smaller than the base, so the base looks like the window frame. Then, make a new layer on top of everything and add a line going down the middle of the picture and across. This will give the look of window panels. You will have to create drapes for the window. I used the red rectangle tool and used the convert point tool to make a nice arch for the big section of the drape. I rasterized it, locked it, added a gradient, and gave it a stoke. When you do that, add a ribbon (explanation for creating a ribbon is in Present section). Then add the tassel under the ribbon. Make sure everything has a gradient and a stroke. When you are finished, merge the layers and duplicate them so you can flip them on the other side.
- Tree:
- Pick a green color and any shape. Add points to create the branches. You need 15 branches coming out of your tree. The tree should get thicker as it reaches the ground. Rasterize it, lock it, add a gradient for shading, and a stroke.
- To create the lights, we need to start with the wires. Add 5 rows of wire on your tree. Use the black line tool and add points to make it wiggly lines. When you are finished, pick a bright yellow color and add a small circle for light. Use FX outer glow to make it glow like a light. You can duplicate the layer to add more and more. Your entire tree needs to be covered in lights.
- You need 3 different types of ornaments: A ball, a star, and a moon. To create the ball use the circle shape tool and add a gradient on it for shine. Create a stoke and duplicate it. For the Star and Moon, you can find them in the Custom Shape Tool. There is a list of strange shapes. If you can't find the star or moon, let me know and I will add it for you.
- Star on top. You will use the custom shape tool to add a star on top. Make sure to have shadows by using gradients and a high light.
- Below the tree layers, you will add a brown trunk by using the rounded rectangle tool. Make sure to add a gradient for shading. Add a stroke as well.
- Pick a green color and any shape. Add points to create the branches. You need 15 branches coming out of your tree. The tree should get thicker as it reaches the ground. Rasterize it, lock it, add a gradient for shading, and a stroke.
- Presents: You will need 6 presents under the tree. Use the rounded rectangle tool to create 6 different shapes and sizes (they can't all be the same size). You can use whatever color you want. Then, you will find a wrapping paper and add it over each present on a blending mode (multiply). For the ribbon, pick a color and use the rounded rectangle tool in the middle of each present. To create the bow, you will start by making a circle. Then, distort a circle shape until it looks like a heart on it's side, or a circle with 2 bumps on it. Add a gradient and a stroke. You will duplicate this shape and flip it on the other side with CTRL+T. When you finish your bow, merge the layers, that way you can duplicate it for all the other presents.
- Holiday Character: On the rug, I created a Rudolph character for the holiday scene. You have to create either a rudolph, a santa, or an elf. The character has to be a cartoon with stroke around it. The holiday character should have a gradient in it. (rudolphs ribbon and blush is a gradient. )
Image Size: 1700 Width by 1200 Height pixels
Last day to work in class is December 18th
Points: 50
 RSS Feed
